While preparing your iOS app for release, you will face a bunch of tedious repetitive procedures, such as dealing with certificates, provisioning profiles, uploading translations, taking screenshots using all languages supported by the app, and so on.
Below, in my tutorial, I’ll tell you about a tool called Fastlane which will take care of most of those tasks for you.
For building, signing, and publishing an application, we will use the following tools:
To install Fastlane we need to have XCode and homebrew installed.
$ xcode-select --install # Ensure latest XCode command-line tools
$ brew cask install fastlane
Navigate to project’s directory and run.
$ fastlane init -u <your-apple-id>The installed Fastlane will generate a basic configuration and fetch existing metadata from iTunes Connect if there is one. As a result, ./fastlane directory with an Appfile and Fastfile will be created.
Appfile can look like this:
app_identifier "com.datarockets.CoolApp"
apple_id "your-apple-id"
team_id "YOURTEAMID"
We will cover Fastfile later.
Fastlane Produce allows the creation of new iOS apps in Apple Developer Portal and iTunes Connect from the command line. Run the following command:
$ fastlane produce -u <your-apple-id> -a <your-app-identifier>We created a new application. It’s time to deal with certificates and the provisioning of profiles. Fastlane Match allows you to sync certificates and provision profiles across a team using a private git repository.
First of all, Fastlane Match creates a separate private git repository where all certificates and provisioning profiles will be stored. For convenience, I suggest using a separate branch for each of your applications. Is this secure?
Run the following command. It will create a match configuration file — Matchfile in ./fastlane directory.
$ fastlane match initMatchfile can look like this:
git_url "https://github.com/datarockets/your-private-certificates-repository"
git_branch "your-app-branch"
team_id "YOURTEAMID"
username "your-apple-id"
Generate certificates and provisioning profiles using one of the following commands.
$ fastlane match development # For Development
$ fastlane match adhoc # For Ad-hoc
$ fastlane match appstore # For App Store
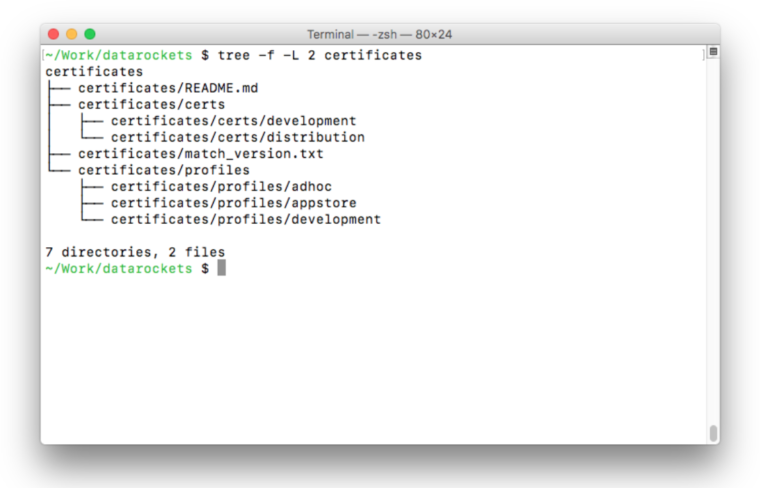
$ fastlane match enterprise # For EnterpriseThat is how a private git repository will look like:
Now, go to XCode and select the newly created profiles in the signing section.
Time to build the app! Fastlane Gym allows you to generate a signed iOS app.
The following command will create a configuration file — Gymfile in ./fastlane directory.
$ fastlane gym initGymfile can look like this:
scheme "CoolApp"
sdk "iphoneos10.0"
include_bitcode true
include_symbols true
clean true
output_directory "./fastlane/build"
output_name "CoolApp_1.0.0"
Now, run the following command to build and package our iOS app in .ipa file:
$ fastlane gymTo submit our app for review, we need to have at least one screenshot per localization, according to guidelines. It’s possible to use the highest resolution screenshot for each device type. Taking all these screenshots can be a tedious and time-consuming task, especially for numerous supported languages. Fastlane Snapshot allows automating this task.
The following command will create a configuration file — Snapfile in ./fastlane directory.
$ fastlane snapshot initSnapfile can look like this:
devices([
  "iPhone 7 Plus"
])

languages([
  "ru",
  "en",
  "de",
  "fr",
  "it",
  "es",
  "nl"
])

scheme "CoolApp"
output_directory "./fastlane/screenshots"
clear_previous_screenshots true
To run
import XCTest

class MunchkinLevelCounterUITests: XCTestCase {

    override func setUp() {
        super.setUp()

        continueAfterFailure = false

        let app = XCUIApplication()
        setupSnapshot(app)
        app.launch()
    }

    override func tearDown() {
        super.tearDown()
    }

    func testScreenshots() {
        let app = XCUIApplication()
        XCUIDevice.shared().orientation = .portrait

        // Screen number onene
        snapshot("0-First-screen")

        // Screen number two
        app.navigationBars.buttons.element(boundBy: 0).tap()
        snapshot("1-Second-screen")

        // Screen number three
        app.navigationBars.buttons.element(boundBy: 1).tap()
        app.alerts.element(boundBy: 0).buttons.element(boundBy: 1).tap()
        snapshot("2-Third-screen")

        // Retunr to the first screen
        XCUIApplication().navigationBars.buttons.element(boundBy: 0).tap()

        XCTAssert(true)
    }
}
All is now set up: now, you just run the following command:
$ fastlane snapshotOptionally, to make screenshots look better, we can use Fastlane Frameit to put screenshots into real device frames. To do so, navigate to the ./fastlane/screenshots directory and run the following command:
$ fastlane frameit goldNow, fill in all required metadata and upload it along with screenshots and app binary to iTunes Connect. To do so, use Fastlane Deliver. Replace app metadata in Deliverfile or in separate .txt files in the ./fastlane/metadata directory. The following command will create a configuration file — Deliverfile in ./fastlane directory.
$ fastlane deliver initDeliverfile can look like this:
app_identifier "com.datarockets.CoolApp"
username "your-apple-id"
ipa "CoolApp_1.0.0.ipa"
app_version "1.0.0"
submit_for_review false

screenshots_path "fastlane/screenshots/"
metadata_path "fastlane/metadata/"
app_rating_config_path "fastlane/rating_config.json"

app_review_information(
  first_name: "Pavel",
  last_name: "Vashkel",
  phone_number: "",
  email_address: "your-email-address",
  notes: "Some note for reviewers"
)

name(
  'en-US' => "CoolApp",
  # ...
  'ru' => "CoolApp"
)

support_url(
  'en-US' => "http://example.com/",
  # ...
  'ru' => "http://example.com/"
)

keywords(
  'en-US' => "some, key, word",
  # ...
  'ru' => "some, key, word"
)

app_icon './AppIcon.png'
platform 'ios'
copyright "2017 datarockets, LLC"

primary_category 'MZGenre.Games'
secondary_category 'MZGenre.Entertainment'
primary_first_sub_category 'MZGenre.Card'
primary_second_sub_category 'MZGenre.Board'
In the config file, we point to the rating_config.json file which we use to calculate app rating in iTunes Connect. Every category is scored from 0 to 2.
{
  "CARTOON_FANTASY_VIOLENCE": 0,
  "REALISTIC_VIOLENCE": 0,
  "PROLONGED_GRAPHIC_SADISTIC_REALISTIC_VIOLENCE": 0,
  "PROFANITY_CRUDE_HUMOR": 0,
  "MATURE_SUGGESTIVE": 0,
  "HORROR": 0,
  "MEDICAL_TREATMENT_INFO": 0,
  "ALCOHOL_TOBACCO_DRUGS": 0,
  "GAMBLING": 0,
  "SEXUAL_CONTENT_NUDITY": 0,
  "GRAPHIC_SEXUAL_CONTENT_NUDITY": 0,
  "UNRESTRICTED_WEB_ACCESS": 0,
  "GAMBLING_CONTESTS": 0
}
Now, run a simple Fastlane Deliver command:
$ fastlane deliverThis step can take a while. Before submitting, the Preview.html file with all app metadata and screenshots will be generated. You can check if everything is correct.
Above, we used every Fastlane tool as a separate command. Although this is not the worst option, we can simplify it with one more config file — Fastfile. Fastfile is a kind of top-level config file where you can define lanes for different tasks.
Fastfile can look like this:
fastlane_version "1.109.0"
default_platform :ios
platform :ios do

  before_all do
    cocoapods(
      clean: true,
      repo_update: true
    )
  end

  desc "Submit a new build to AppStore"
  lane: release do

    produce
    match(type: "appstore")
    gym(
      export_method: "app-store",
      export_options: {
        provisioningProfiles: {
          "com.datarockets.CoolApp" => "match AppStore com.datarockets.CoolApp"
        }
      }
    )
    snapshot
    frameit gold
    deliver

    desc "Post a message to slack channel"
    slack(
      message: "CoolApp was released",
      slack_url: "https://hooks.slack.com/services/desired-chanel"
    )

    error do |lane, exception|
    end

  end

end
Now, instead of a bunch of separate commands, only one needs to be executed – Fastlane iOS release:
$ fastlane ios releaseFastlane is a great tool to help add more automation to the development process and make app development fun again.
Fastlane iOS Official documentation
Follow Pavel on Medium to be the first to read his articles.

Check out our newsletter
2024 Red Panda Technology (dba datarockets) All Rights Reserved