Map markers clustering using Google Maps Utils
During the development of one of the apps in 2016, I had to solve a pretty complex task. The app needed to demonstrate some kind of heat map from clusters with venues, which would be concretized on zoom-in or generalized on zoom-out. I decided to look for a solution that could help me do the same thing and simplify implementation because I didn’t want to go deeply into legacy-based code. Eventually, I found an interesting open-source library called Google Maps Utils to set a marker on Google Maps.
According to the description, this library helps to solve a number of tasks related to Google Maps API usage: clustering, the creation of interactive maps, demonstration of test data on your markers, showing paths, KML-data, and handling GeoJSON.
Today I would like to talk about how we can reduce down lines of code with Google Maps clustering logic.
How to add Google Maps Utils to your project
Add it as a dependency in your build.gradle file:
dependencies {
    compile 'com.google.maps.android:android-maps-utils:0.5+'
}
Implementing markers and clustered markers
The challenge we faced was to demonstrate the markers of different venues in the city of Toronto and show their “heat” in the form of a circle of varying degrees of color. The heat is calculated on the server using our unique algorithm. Here is a basic version of JSON with a list of venues from the backend:
{
  "venues": [
    {
      "venue_name": "Venue Name 1",
      "latitude": 52.11,
      "longitude": 54.53
    },
    {
      "venue_name": "Venue Name 2",
      "heat_rate": 2,
      "latitude": 52.11,
      "longitude": 54.53
    },
    {
      "venue_name": "Venue Name 3",
      "heat_rate": 1,
      "latitude": 52.11,
      "longitude": 54.53
    }
  ]
}
The heat_rate field contains an integer from 0 to 4. Depending on this parameter, we paint our custom indicator-marker from 0 to 4 with the color red.
After you’ve added Google Maps as a Gradle or Maven dependency you need to implement ClusterItem interface into your POJO-class, creating the method getPosition, which returns the LatLng object that will be used on the map.
public class Venue implements ClusterItem {

    @SerializedName("latitude")
    @Expose
    private double latitude;

    @SerializedName("longitude")
    @Expose
    private double longitude;

    @Override
    public LatLng getPosition() {
        return new LatLng(latitude, longitude);
    }
}
Next, you need to initialize the map. In our project, we use SupportMapFragment, which asynchronously returns a GoogleMap object. At the beginning of the class, we defined a ClusterManager that is responsible for turning our markers into cluster markers and vice versa. As a generic parameter, we pass Venue class, as it has the ClusterItem interface implemented.
public class MapActivity extends AppCompatActivity implements
        OnMapReadyCallback {

    private GoogleMap googleMap;
    private SupportMapFragment mapFragment;
    private ClusterManager<Venue> clusterManager;

    @Override
    protected void onCreate(Bundle savedInstanceState) {
        super.onCreate(savedInstanceState);
        setContentView(R.layout.fragment_map);
        mapFragment = (SupportMapFragment) getSupportFragmentManager().findFragmentById(R.id.map_view);
        mapFragment.getMapAsync(this);

    }
}
In the onMapReady method implemented by the OnMapReadyCallback interface, we next make our Google Map object global. This enables you to choose whether to work with it in the whole activity or as a fragment.
@Override
public void onMapReady(final GoogleMap googleMap) {
    this.googleMap = googleMap;
    setupMap();
}
Then we can create the private method setupMap(), where we initialize our ClusterManager and pass our activity context and already initialized map to the constructor.
private void setupMap() {
   clusterManager = ClusterManager<Venue>(this, googleMap);
}
Now we can add markers to the map and remove markers from it. We have a few methods for performing operations with markers. For example, the addItem() and addItems() methods are responsible for adding a marker to the map. A ClusterManager automatically converts multiple markers in the same area into clusters. You can add markers to clusterManager as a list or one by one.
Venue venue = new Venue();
clusterManager.addItem(venue);

List<Venue> venues = new ArrayList<Venue>();
clusterManager.addItems(venues);
Then we call the cluster() method to perform clustering on the existing markers. If there are a lot of markers, they immediately turn into clusters.
clusterManager.cluster();You can get access to the collection of markers and to the collection of clusterized markers by using the methods getMarkerCollection() and getClusterMarkerCollection(), respectively.
clusterManager.getMarkerCollection();

clusterManager.getClusterMarkerCollection();
If you want to remove markers and clusters from the map, you can use the clearItems() method.
clusterManager.clearItems();In some cases, you may want to remove markers or clusterized markers. The same clear() method is available for marker collections and cluster marker collections.
clusterManager.getMarkerCollection().clear();
clusterManager.getClusterMarkerCollection().clear();
Initially, ClusterManager will display clustered markers as circles with an approximate quantity of the markers inside the clusters. How can we define the condition when markers should turn into clusters and vice versa? Or customize the look of the markers and clusters? I’ll describe this process in the next part.
Introducing custom renderers
A renderer in ClusterManager is the central object when it comes to customizing our map markers and clusters. When we initialized ClusterManager in setupMap() method, we automatically told ClusterManager that we wanted to use it as the default renderer. But we can always create a custom renderer that enables us to customize the map markers and clusters. It’s pretty likely that in most cases you will have to write your own renderer to satisfy your needs.
The first step is to create a custom class, inherit it from the class DefaultClusterRenderer<Venue>, and then implement three methods: onBeforeClusterItemRendered, onBeforeClusterRenderer, and shouldRenderAsCluster. We need to pass three parameters to the constructor: context, googleMap, and clusterManager.
public class VenueMarkerRender extends DefaultClusterRenderer<Venue> {

    private final Context mContext;

    public VenueMarkerRender(Context context, GoogleMap map, ClusterManager<Venue> clusterManager) {
        super(context, map, clusterManager);
        mContext = context;
    }

    @Override
    protected void onBeforeClusterItemRendered(Venue item, MarkerOptions markerOptions) {
        Bitmap venueCircle = VenueCircleFactory.createFromVenue(item);
        markerOptions.icon(BitmapDescriptorFactory.fromBitmap(venueCircle);
    }
    @Override
    protected void onBeforeClusterRendered(Cluster<Venue> cluster, MarkerOptions markerOptions) {
        Bitmap venueCircle = VenueCircleFactory.createFromCluster(cluster);
       markerOptions.icon(BitmapDescriptorFactory.fromBitmap(venueCircle);
    }

    @Override
    protected boolean shouldRenderAsCluster(Cluster<Venue> cluster){
        return cluster.getSize() > 1;
    }

}
onBeforeClusterItemRendered(Venue venue, MarkerOptions markerOptions)
Here we describe the properties of the markers that will be shown after disclosure of a cluster. We can take properties from the Venue object that we want to use in our marker, which comes from the disclosed cluster. I create a circle bitmap with the help of VenueCircleFactory class and its method, which generates a bitmap icon to replace an original marker.
onBeforeClusterRendered(Cluster<Venue> cluster, MarkerOptions markerOptions)
Here we describe the properties of the clustered marker that itself represents a cluster of markers. I pass a cluster to my factory, where I calculate an average value of the heat rate value and generate a bitmap icon.
shouldRenderAsCluster(Cluster<Venue> cluster)
As you might expect, here we specify a condition under which a certain number of tokens will become a cluster. I decided to set the value to 1. That means that if in the field of vision there is more than one venue, they immediately turn into a cluster.
Then we can pass this custom renderer in setupMap() method:
private void setupMap() {
clusterManager = ClusterManager<Venue>(this, googleMap);
VenueMarkerRender renderer = new VenueMarkerRender(this, googleMap, clusterManager);
clusterManager.setRenderer(renderer);
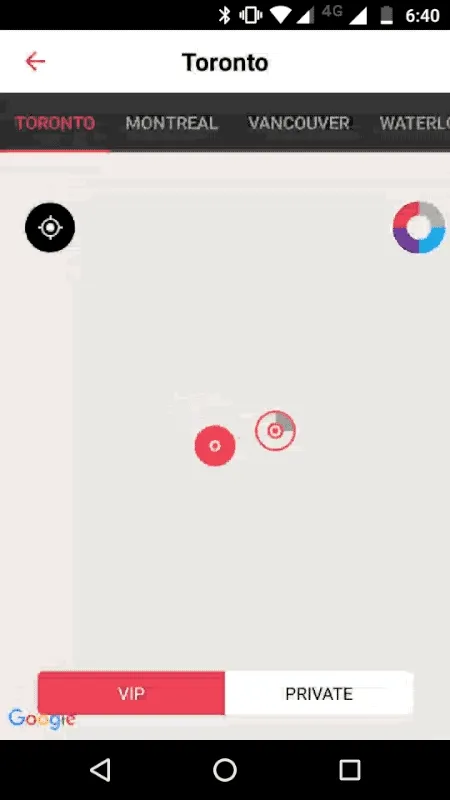
}And now we can see our changes on the map. When we zoom in to see more venues in the center of Toronto, our clusterized markers turn into multiple markers, each with a different circle, instead of standard markers colored red, depending on the heat_rate value.
Google Map marker click event
When we want to handle click events in Android, we usually set up click listeners to the activity and we’re good to go. The same approach works for working with clusterized markers and markers in Google Map. We can set up numerous click listeners for markers and cluster markers. First of all, we implement ClusterManager-based interfaces in our activity class.
public class MapActivity extends AppCompatActivity implements
        OnMapReadyCallback,
        ClusterManager.OnClusterClickListener<Venue>,
        ClusterManager.OnClusterItemClickListener<Venue>,
        ClusterManager.OnClusterItemInfoWindowClickListener<Venue> {
OnClusterClickListener is responsible for what is going to happen when we tap on a cluster that contains a lot of markers inside. OnClusterItemClickListener will handle our taps on markers that were part of a cluster. And finally, OnClusterItemInfoWindowsListener handles our taps on the info window of markers.
Let’s tell our setter methods that we have those interfaces already implemented into our class. We can do this in our setupMap() method:
clusterManager.setOnClusterClickListener(this);
clusterManager.setOnClusterItemClickListener(this);
clusterManager.setOnClusterItemInfoWindowClickListener(this);
And let’s write an implementation of the three methods implemented by on-click listeners. When I tap on a cluster, I want to zoom in to the specific area and see all the markers that were hidden by the cluster. We make it with LatLngBuilder, providing the positions of all the markers from the cluster and then building bounds of the area where we should point the camera. We have a method called animateCamera() where we provide the bounds and time of updating camera position.
@Override
public boolean onClusterClick(Cluster<Venue> cluster) {

    LatLngBounds.Builder builder = LatLngBounds.builder();
    Marker<Venue> venueMarkers = cluster.getItems();

    for (ClusterItem item : venueMarkers) {
        LatLng venuePosition = item.getPosition();
        builder.include(venuePositiong);
    }

    final LatLngBounds bounds = builder.build();

    try { googleMap.animateCamera(CameraUpdateFactory.newLatLngBounds(bounds, 100));
    } catch (Exception error) {
      Log.e(error.getMessage());
    }

    return true;
}
For the moment, let’s leave everything in the onClusterItemClick implementation as it is. I will describe how we show custom info windows in the next part of this article.
@Override
public boolean onClusterItemClick(Venue venue) {
    return false;
}
The task description says that I should open the venue page when I tap on the info window of the marker. For example, I can start a new activity. Feel free to perform your specific app-based logic here.
@Override
public void onClusterItemInfoWindowClick(Venue venue) {
    Intent venueActivity = new Intent(this, VenueActivity.class);
    startActivity(venueActivity);
}
It may look like we’re done, but we still need to tell our Google Map object that ClusterManager will handle all the taps on the markers and the clusters. So, before these three lines of code, let our Google Map object know that ClusterManager is king here.
googleMap.setOnMarkerClickListener(clusterManager);
googleMap.setInfoWindowAdapter(clusterManager.getMarkerManager());
googleMap.setOnInfoWindowClickListener(clusterManager);
And finally we get this:
googleMap.setOnMarkerClickListener(clusterManager);
googleMap.setInfoWindowAdapter(clusterManager.getMarkerManager());
googleMap.setOnInfoWindowClickListener(clusterManager);
clusterManager.setOnClusterClickListener(this);
clusterManager.setOnClusterItemClickListener(this);
clusterManager.setOnClusterItemInfoWindowClickListener(this);
Showing custom info windows
Besides creating the heat map with circles, one of the requirements of the task was to show a title and an address in a custom-designed window when we tap on the marker of a particular venue. A standard marker object has the default info window, but we have to customize it. How do we do that?
Our ClusterManager lets us customize info windows via its setOnInfoWindowAdapter method, where we can define how a customized info window is going to look. First, we need to get access to the markers collection and then set the info window adapter to it.
clusterManager.getMarkerCollection().setOnInfoWindowAdapter(new GoogleMap.InfoWindowAdapter() {
    @Override
    public View getInfoWindow(Marker marker) {
        LayoutInflater inflater = (LayoutInflater) getSystemService(Context.LAYOUT_INFLATER_SERVICE);

        final View view = inflater.inflate(R.layout.custom_info_window, null);

        TextView venueName = (TextView) view.findViewById(R.id.venue_name);

        TextView venueAddress = (TextView) view.findViewById(R.id.venue_address);

        return view;
    }

    @Override
    public View getInfoContents(Marker marker) {
        return null;
        }
});
In getInfoWindow we simply inflate a view from XML-file; then we can do whatever we want related to showing custom info when a marker is tapped. You might notice that there is no Venue object in the adapter: we need to find a way how to pass the venue of the clicked marker to the adapter.
I can define a clickedVenueMarker variable that changes when I tap on a marker.
public class MapActivity extends AppCompatActivity implements
        OnMapReadyCallback,
        ClusterManager.OnClusterClickListener<Venue>,
        ClusterManager.OnClusterItemClickListener<Venue>,
        ClusterManager.OnClusterItemInfoWindowClickListener<Venue> {
    private Venue clickedVenueMarker;
Then I can easily use clickedVenueMarker in the InfoWindowAdapter block where we change info about the selected marker.
clusterManager.getMarkerCollection().setOnInfoWindowAdapter(new GoogleMap.InfoWindowAdapter() {
    @Override
    public View getInfoWindow(Marker marker) {
        LayoutInflater inflater = (LayoutInflater) getSystemService(Context.LAYOUT_INFLATER_SERVICE);

        final View view = inflater.inflate(R.layout.custom_info_window, null);

        TextView venueNameTextView = (TextView) view.findViewById(R.id.venue_name);

        TextView venueAddressTextView = (TextView) view.findViewById(R.id.venue_address);
        venueNameTextView.setText(clickedVenueMarker.getName());

        venueAddressTextView.setText(clickedVenueMarker.getAddress());
        return view;
    }

    @Override
    public View getInfoContents(Marker marker) {
        return null;
    }
});
And finally, I can change an implementation of the onClusterItemClick method and add one line of the code where the selected marker is passed from its cluster to clickedVenueMarker. When a user taps on a marker, clickedVenueMarker is updated and the user sees info about the tapped venue.
@Override
public boolean onClusterItemClick(Venue venue) {
    clickedVenueMarker = venue;
    return false;
}
And now we’ve got this! For example, I tapped on Gravity SoundBar and then on SET on King. These info windows were changed, and then when I tapped on SET on King’s info windows, I was immediately redirected to the venue page. Looks fantastically easy, doesn’t it?

Marker cluster Google maps summary
As you can see, using the Google Maps Utils library allows me to write less code and get results faster. Also, you can customize the appearance of markers and cluster markers to satisfy your needs. I replaced hundreds of lines of legacy code with a simple MapActivity where all the google maps clustering logic was described in the post and nothing more.
Follow Dmitry on Medium to read about his awesome experience.