A quiet appearance of a new version of the leading operating system was unexpectable even not only for the users but for developers too. Usually, Google presents a new version of Android right before annual Google I/O conference, but this time the circumstances have been changed and now we have an opportunity to taste all the new features of Android N. I will try to describe and utilize most of Android N new features. Let’s begin.
For a long time, developers were waiting for Java 8 support in Android and it partially happened. The developers from Google have presented JACK (Java Android Compiler Kit). It’s a new way to compile Java source code into Android dex-bytecode.
To enable Java 8 support, add a block jackOptions into your build.gradle file and don’t forget to set targetCompability and sourceCompatibility to 1.8.
apply plugin: 'com.android.application'

android {
   compileSdkVersion 'android-N'
   buildToolsVersion '24.0.0 rc1'

   defaultConfig {
       applicationId "by.datarocketsandroid"
       minSdkVersion 'N'
       targetSdkVersion 'N'
       versionCode 1
       versionName "1.0"

       jackOptions {
           enabled true
       }

   }

   buildTypes {
       release {
           minifyEnabled false
           proguardFiles getDefaultProguardFile('proguard-android.txt'), 'proguard-rules.pro'
       }
   }
   compileOptions {
       targetCompatibility 1.8
       sourceCompatibility 1.8
   }
}

dependencies {
   compile fileTree(include: ['*.jar'], dir: 'libs')
   testCompile 'junit:junit:4.12'
   compile 'com.android.support:appcompat-v7:24.0.0-alpha1'
}
A simple example: let’s try to implement showing Toast message on a button click.
Before the appearance of Java 8 support, we had to create anonymous inner classes or use libraries.
Button btnChangeText, btnLaunchSecondActivity;
TextView txtDraggableText;

@Override
protected void onCreate(Bundle savedInstanceState) {
    super.onCreate(savedInstanceState);
    setContentView(R.layout.activity_main);

    btnEnterPictureInPicture = (Button) findViewById(R.id.btnEnterPicture);
    btnEnterPictreuInPicture.setOnClickListener(new View.OnClickListener() {
        @Override
        public void onClick(View view) {
            Toast.makeText(MainActivity.this, 'This is the old school, bro!', Toast.LENGTH_SHORT).show();
        }
    });
}
With the appearance of partial Java 8 support, everything becomes much better (even Android Studio notifies us that we have an ability to use lambdas to cut useless code). Moreover, we can import static methods. And now method Toast.makeText becomes just makeText. It makes our code better and cleaner.
import static android.widget.Toast.makeText;

public class MainActivity extends AppCompatActivity {

Button btnChangeText, btnLaunchSecondActivity;
TextView txtDraggableText;

@Override
protected void onCreate(Bundle savedInstanceState) {
    super.onCreate(savedInstanceState);
    setContentView(R.layout.activity_main);

    btnEnterPictureInPicture = (Button) findViewById(R.id.btnEnterPicture);
    btnEnterPictreuInPicture.setOnClickListener(view ->
        makeText(MainActivity.this, 'This is the old school, bro!', Toast.LENGTH_SHORT).show());
Pay attention that lambdas are available for all of the applications back to Gingerbread (2.3), but all other Java 8 features like functions, streams, functional interfaces are available starting only from Android N and above.
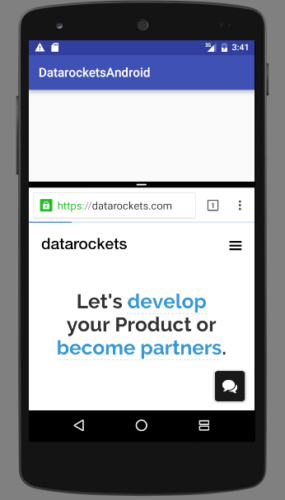
Starting with Android N developers can use split-screen mode in their applications. Let’s try this new feature.
Open your AndroidManifest.xml. Here you can add a block called layout inside the application/activity block where you can define all of the parameters for split-screen support. Let’s look at each of them:
<activity
  android:name=".activities.MainActivity"
  android:resizeableActivity="true">

  <intent-filter>
    <action android:name="android.intent.action.MAIN"/>
    <category android:name="android.intent.category.LAUNCHER"/>
  </intent-filter>

  <layout android:defaultHeight="500dp"
    android:defaultWidth="600dp"
    android:gravity="top|end"
    android:minimalSize="400dp"/>
</activity>
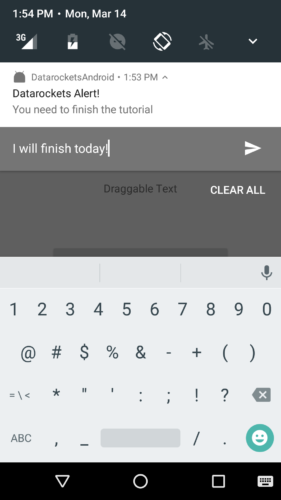
Now you can implement dragging and dropping from one application to another in split-screen mode. It’s one of the best features in the new version of Android I think. Just imagine how easy can be sharing photos from Facebook to Telegram!
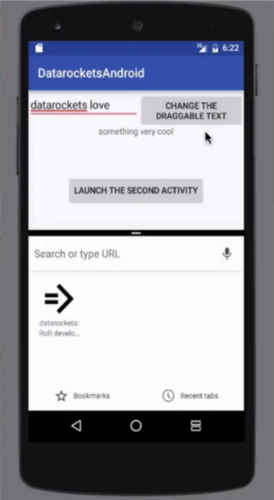
Let’s look at how to use this feature in your application with the TextView-component.
ClipData grabs the text from TextView. Then we build our shadow. And here we use a new startDragAndDrop method instead of startDrag which has been deprecated. Do not forget about View.DRAG_FLAG_GLOBAL flag. It allows us to pass the data to another application.
txtDraggableText = (TextView) findViewById(R.id.txtDraggableText);

txtDraggableText.setOnTouchListener((view, motionEvent) -> {
   ClipData data = ClipData.newPlainText('Title', txtDraggableText.getText().toString());
   View.DragShadowBuilder shadowBuilder = new View.DragShadowBuilder(view);
   view.startDragAndDrop(data, shadowBuilder, view, View.DRAG_FLAG_GLOBAL);
   return true;
});
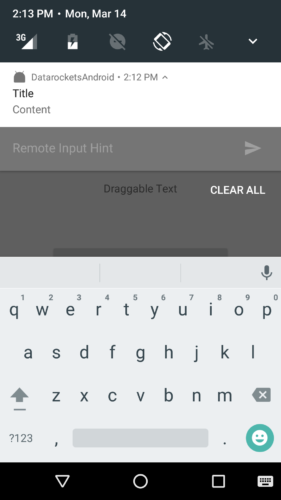
Android N notifications became more functional than before in Android Lollipop and Marshmallow. You can type an answer right in the edit textbox inside notifications.
For this tutorial in the test application, I have added a couple of strings into strings.xml to use further.
<resources>
  <string name='app_name'>DatarocketsAndroid</string>
  <string name='input_label'>Remote Input Button</string>
  <string name='input_label_hint'>Remote Input Hint</string>
  <string name='example_content'>Content</string>
  <string name='example_title'>Title</string>
  <string name='text_from_remote_input'>Text from remote input</string>
</resources>
Then I defined a NotificationManager and some static variables in my activity class.
NotificationManager notificationManager;

private static final String KEY_TEXT_REPLY = 'key_text_reply';
private static final int NOTIFICATION_ID = 0;
I initialize the notification manager inside OnCreate.
notificationManager = (NotificationManager) getSystemService(NOTIFICATION_SERVICE);
I’ve created a method called openNotification. Let’s look at it:
private void openNotication() {

   RemoteInput remoteInput = new RemoteInput.Builder(KEY_TEXT_REPLY)
           .setLabel(getString(R.string.input_label_hint))
           .build();

   Intent intent = new Intent(this, MainActivity.class);
   intent.putExtra(MainActivity.class.getName(), getString(R.string.text_from_remote_input));

   PendingIntent replyPendingIntent = PendingIntent.getActivity(this, 0, intent, 0);

   Notification.Action remoteInputAction =
           new Notification.Action.Builder(R.mipmap.ic_launcher,
                   getString(R.string.input_label), replyPendingIntent)
                   .addRemoteInput(remoteInput)
                   .build();

   Notification notification = new Notification.Builder(this)
           .setSmallIcon(R.mipmap.ic_launcher)
           .setContentTitle(getString(R.string.example_title))
           .setContentText(getString(R.string.example_content))
           .addAction(remoteInputAction)
           .build();

   notificationManager.notify(NOTIFICATION_ID, notification);
}
First of all, I create RemoteInput instance with RemoteInput.Builder where I define a key KEY_TEXT_REPLY and desirable hint text for the input field. KEY_TEXT_REPLY will be used to obtain provided text in activity and handle it.
Secondly, I bind the notification to a particular activity which receives the text via the creation of Intent with extra data and PendingIntent.
Then I create an action for the notification (Notification.Action.Builder).
Before the final step, I build the notification with Notification.Builder where I add the action with the remote input.
And finally, we are ready to notify our user of the ability to answer immediately without opening an application with the notify method.
If your application uses a secured internet connection, you may have previously established a certificate check with dozens of lines of code. In Android N Google developers have simplified that process for us.
First of all, you need to create a new file inside res/xml directory with a block ‘network-secure-config.xml’.
Here is a simple example of the config:
<?xml version='1.0' encoding='utf-8'?>
<network-security-config>

   <!-- Standart configuration -->
   <domain-config>
       <domain includeSubdomains='true'>datarockets.com</domain>
       <trust-anchors>
           <certificates src='@raw/datarockets_ca'/>
       </trust-anchors>
   </domain-config>

   <!-- Config with additional certificates -->
   <base-config>
       <trust-anchors>
           <certificates src='@raw/datarockets_extra_ca'/>
           <certificates src='system'/>
       </trust-anchors>
   </base-config>

   <!-- Config for debug -->
   <debug-overrides>
       <trust-anchors>
           <certificates src='@raw/datarockets_debug_ca'/>
       </trust-anchors>
   </debug-overrides>

</network-security-config>
Standard configuration can be suitable for the situations when you use a self-signed SSL certificate or certificate which was issued by a nonpublic CA.
Sometimes your application has to use the certificates which were issued by additional CAs and cannot be trusted by the system. The inclusion of the system certificates is a good solution in such situations.
Config for debugging can be added if you use some certificates to debug your application.
Pay attention that certificates should be in PEM or DER format to be applied by your application.
And finally, do not forget to add a metadata block in your manifest-file to link with the network_security_config where you defined the parameters for certificates.
<manifest xmlns:android='http://schemas.android.com/apk/res/android'
   package='by.datarocketsandroid'>

   <application
       android:allowBackup='true'
       android:icon='@mipmap/ic_launcher'
       android:label='@string/app_name'
       android:supportsRtl='true'
       android:theme='@style/AppTheme'>

       <meta-data android:name='android.security.net.config'
           android:resource='@xml/network_security_config'/>
As you can see, Android N has reached the new heights and now developers can adopt these awesome features in their applications to make the user experience better. This is my first post about Android development on the blog. Hope, I will cover other interesting topics in the next materials.

Check out our newsletter