React Native architecture: arranging components into layers
One of the problems that comes for one project to another is creating of expandable and easy to reason about architecture. In the world of React under the word “architecture” we mean the splitting of responsibilities across special components dedicated to doing the only one thing. In this article, we’re going to take a look at how to implement it.
A small disclaimer, that it’s a result of experience we got in the team which includes only web developers asking for some help from a true mobile department.
React Native Architecture
We divided our components into several layers to achieve a better understanding of what part of business logic should go where:
- Screens
- Containers
- CombineViews
- Views
Let’s talk about this layers closely one by step.
Screens component
A screen is a component which is rendered by router. It’s responsible for the following tasks:
- being plugged into router, having a specific URL
- grabbing id, title, etc. from params and providing it to a Container/CombineView
- holding the goTo<somewhere> method and passing it to a Container/CombineView
Take a look at this code snippet of the screen’s code arrangement we use:
import Home from "src/containers/Home"

class HomeScreen extends React.Component {
  render = () => pug`
   Home(
     userId=this.userId()
     goToSettings=this.goToSettings
     goToNotifications=this.goToNotifications
     goToStudentProfile=this.goToStudentProfile
   )
 `
  userId = () => this.props.navigation.state.params.id

  goToSettings = () => this.props.navigation.navigate("Settings")

  goToNotifications = () => this.props.navigation.navigate("Notifications")

  goToStudentProfile = (id, studentName) =>
    this.props.navigation.navigate("StudentProfile", { id, title: studentName })
}
Pay attention to the importing of the Home container, defining the goTo methods to use it inside a View component reacting of clicks, grabbing an id from params.
Go further!
Containers
The layer of containers is a data boss: grabbing data from the store, transforming it to more suitable for a view shape, storing some minor state which is dedicated only for this part of the app like shouldShowModal.
It’s better to have a real example of using such component. Take a look at the container organizing we’ve got in our projects:
import React from "react"
import { connect } from "react-redux"

import Home from "src/components/Home"

import { denormalizeStudents } from "src/models/Students/normalizer"

const mapStateToProps = ({ students }) => {
  const result = denormalizeStudentData(students.list, students.entities)

  return { students: result }
}

const mapDispatchToProps = {
  startFetchData: actions.startFetchData.init,
}

class HomeContainer extends Component {
  state = {
    shouldShowModal: false,
  }

  componentDidMount() {
    this.props.startFetchData()
  }

  render = () => pug`
   Home(
     shouldShowModal=this.state.shouldShowModal
     students=this.props.students
     goToSettings=this.props.goToSettings
     goToNotifications=this.props.goToNotifications
     goToStudentProfile=this.props.goToStudentProfile
   )
 `
}

export default connect(mapStateToProps, mapDispatchToProps)(HomeContainer)
Here you can notice the using of denormalization. It’s a part of the data transforming process (also a small teaser for the next post 😉 )
CombineViews
It a connector of the worlds of data and UI: it gets the props from a container and distributes it across small UI components – Views. Check out the example of a combine view:
class Home extends React.Component {
  render = () => pug`
   Content
     Header(
       goToSettings=this.props.goToSettings
       goToNotifications=this.props.goToNotifications
     )

     StudentList(
       data=this.props.students
       onStudentClick=this.props.goToStudentProfile
     )
 `
}
And it’s enough. Of course, you can store here a state which doesn’t affect other parts of the app, like isModalOpened, etc. Be wise 😎
View
Aaaaand views – working staff of your app. Views are small parts which we use to build up the app – buttons, checkboxes, headers, etc. And I’d like to say the following: keep it as simple as possible. You can achieve it by passing as simple props as you can (a string, not an object i.e), reducing the state and the size of such components. It gives you an ability to reuse your code by constructing a big component from the small ones.
That’s it 🙂
Summary
To understand the whole picture of how we create React Native apps using our project architecture take a look at the following schema of a sample pet app:
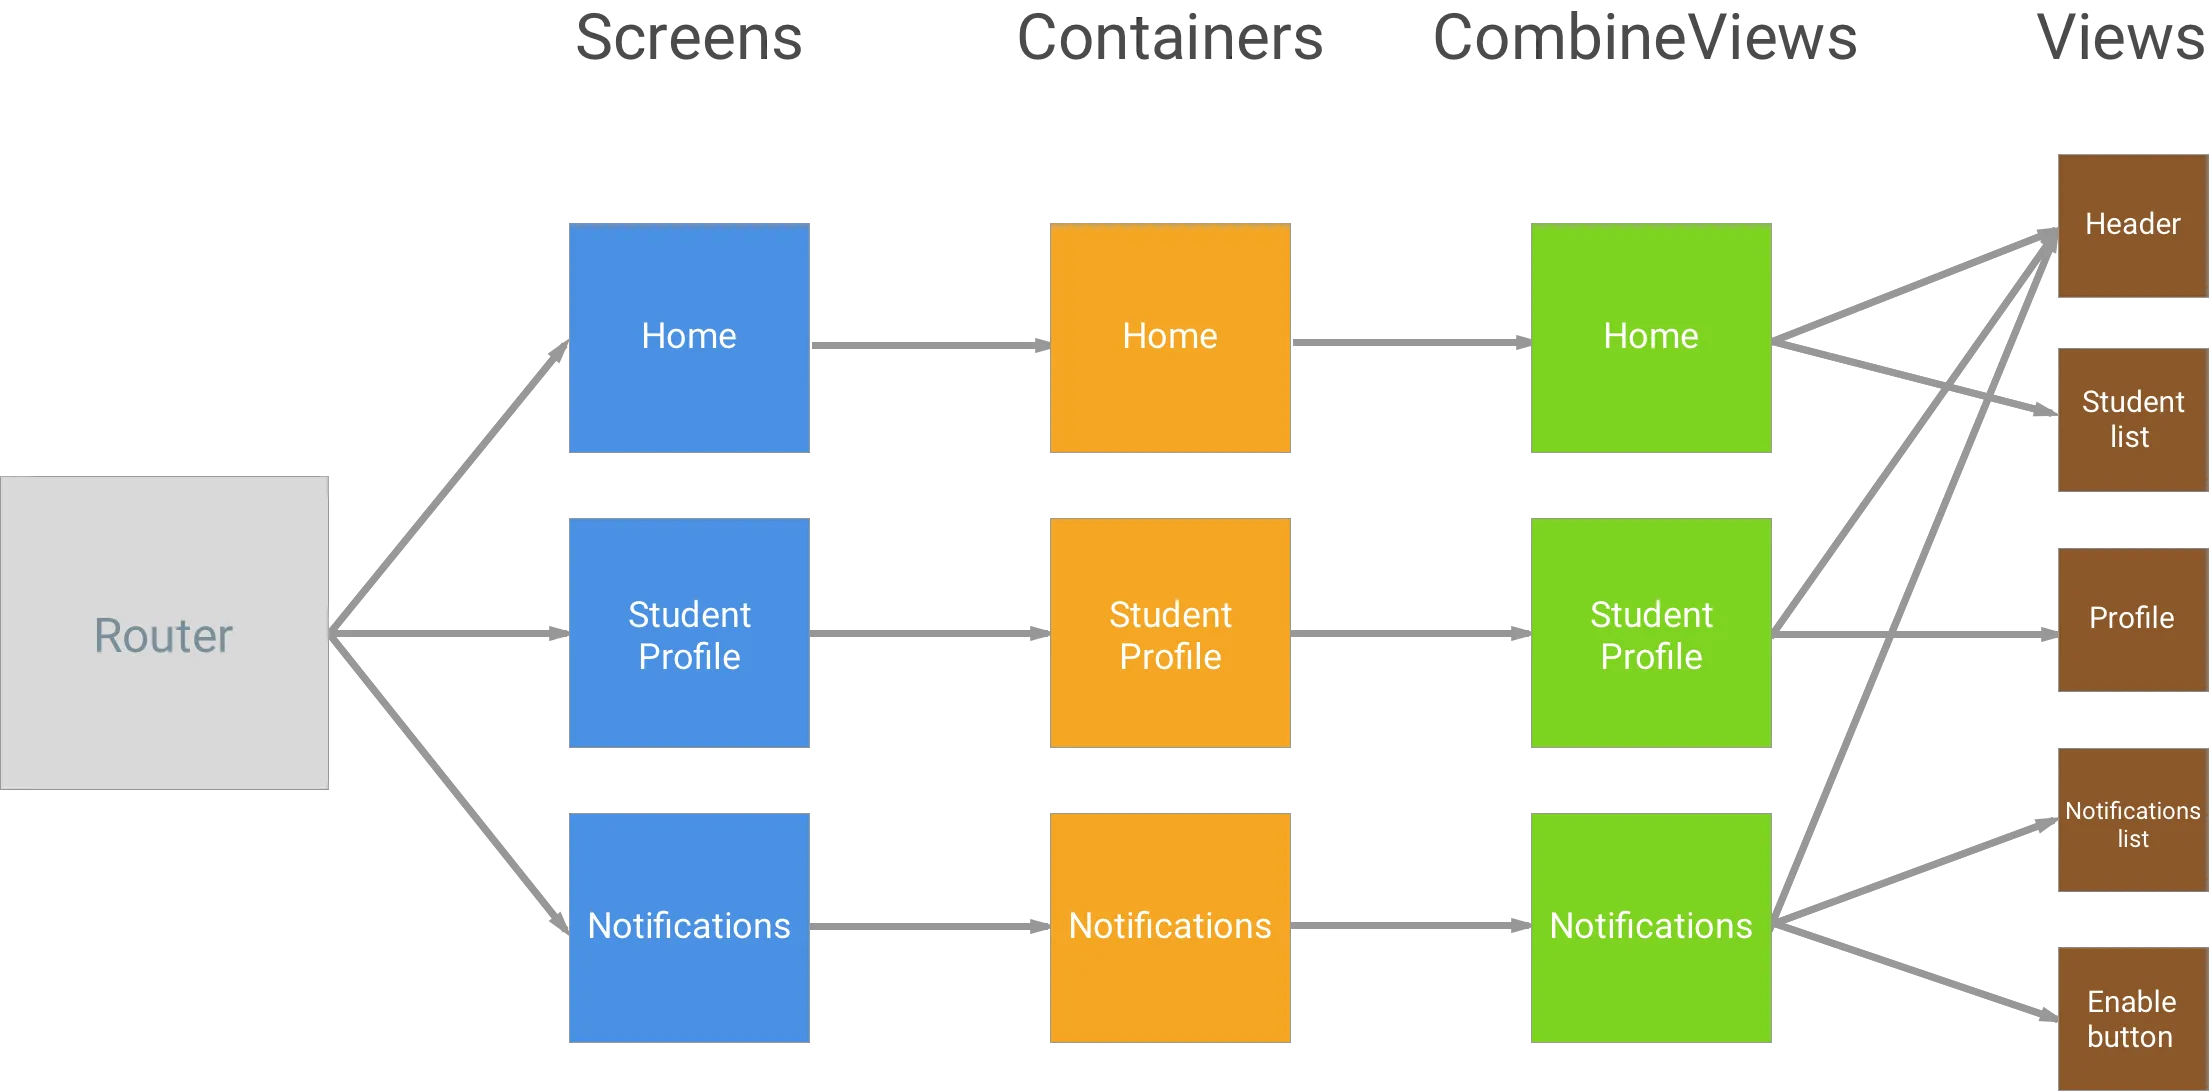
The approach of arranging business logic helps us to clearly know what goes where not polluting containers or simple views with state and methods. Piece!
It’d be great to look at your ideas, so that go ahead and share your thoughts about approaches how the community can do better React Native apps.
Happy coding!